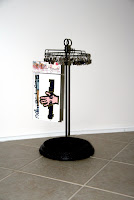
WOW!!! I had sooooo many emails, PM's and comments on how to make the spinning rack!!! I mean hey - I understand!! It is way freaking cool!!! LOL
I got sooooo many comments actually I contacted the "creator" herself (her name is Amy and she lives here in the South to boot!!!). I used my southern charm and asked her if I could just link back to her and her directions. I am very happy to report that she said that would be great!!! (You just have to love GA girls!! We are the friendliest people you'll ever find - wellllllll until you make us mad anyway!!!)
Amy is a "thrifty crafter" too!!!! Actually in all honesty I think she is more "thrifty" than me!!! Check out
her blog for some way way way cool ideas and stuff!!! She actually decorated a composition book for her son using soda cans!!! I KID YOU NOT!!!!! It is really pretty awesome - and I have to say after visiting her blog I think I want to go garage sale shopping!!!
(OH WOW - I just went and looked at Amy's blog - did you see the WAY WAY WAY cute pocket knife project?!?!? -- Why can't I think of things like that!?!?! Click Here to see it!)Ok - so to get the directions on how to make the spinning rack go too the
Rocky Mountain Hobbies Message Board. (Click on the words and it will take you straight to the correct thread you need to go too!!!) You do not have to join to view the message board there!
Now - let me tell you - I really like
Rocky Mountain Hobbies. My dear friend and prayer warrior
Susan clued me in on this great site!!! They have awesome shopping there ~ from
a monthly kit club to
a bargain basement (where everything is 60% to 90% off - and you know me I LOVE a sale!) They really do have it all!!! And make sure you check this out - when you look at the paper - and you scroll your cursor over the photo - it pops up a larger sample of that sheet of paper!!! No more guessing what you think the paper looks like!!! How cool is that!!!!
Ok - back to Amy and her spinning rack (LOL)! When Amy emailed me back she said that it will be a little ways down the road but that she is going to have another project coming and this time it is a ribbon organizer!!!! Oh yeah!!!! You know I will be watching for that!! I'll let you all know when I see it!!!
For my personal spinning rack I used the following:
~ 10" terracotta saucer
~ 8" lamp shade wire frame
~ I cut my threaded rod to 21" long by using a hack saw and making sure I went right between the threads to keep from damaging them! This made it where I could still screw the bolts and things over the threads!
~ I painted the whole thing black. Then I spray painted just the base with Krylon "Make it Stone" texture paint in color "Obsidian". Followed that up with a coat of crystal clear acrylic.
~ I also took some cork contact paper and cut out an circle the same size as the terracotta saucer and stuck it to the bottom of my rack once it was complete - so that way it made a cork pad for the whole thing to sit on - hence it shouldn't scratch my table or counter tops!!!
~ For the clips - I used the Darice Dangler Clips (that I got from
Joann's Fabric online!). But when I hung them from my lamp shade frame - they didn't hang the way I wanted them to - so I used
7mm jump rings (also got them at Joann's). Now this was a little time consuming I will be honest with you!!! But I did while I was watching TV! I actually opened each ring, placed it on the wire frame, then closed it up. Those jump rings are what I hung the dangler clips from!

So there you have it - I would love to see photos of your spinning racks when you get them done!!!
Until Next Time!
Cya~
Lori
(Since I gave you the link to get the directions here on my site - I will not be responding to allllll the emails I received - wheeewwww!! There were just tooo many of them!!! Sorry!!!! So if you needed something other than the directions and I didn't respond to you - please email me again!!!! Thanks!!!)
.jpg)


