Ok today is going to be brief - I have tons of stuff on the to do list...One of them - that you might want to thinking about is... I have decided to sell my KNK Element!!! Yep! I haven't had it long at all - and I have actually only cut three things with it (but let me tell you it cuts awesome!!!) and now I am selling it!!!
I bet you are thinking if it is SOOOO AWESOME why are you selling it.... well I have decided that for what I do (outside of my paperthreads files)... I really want the 13" cutting width! I have always wanted the 13" but when the price went up - I was like hmmm do I really need that.... and the when I was able to afford it - they had discontinued that size!!!!! So I got the element instead..... and then this past week I heard they are bring the 13" back!!!!!
After much talk with hubby - who said "I told you to get the big one to begin with!", I decided I will be selling my Element... and I am going to throw in some stuff with it to sweeten the deal!! So if you have been thinking about getting the KNK Element.... check back here!!!
Now - I have had several people ask how did I make the photo frame collage on my wall....

Well here you go:
I purchased 20 frames..... (Mine all matched but you could mix and match if you wanted) You can spend as much or as little as you want! I got my frames on 40% off!!!
5~5x7's
10~4x6's
5~3.5x5.5's
I got 70 1/2" cup hooks
I purchased 15 feet of black decorative chain from Lowe's
1 can of flat black spray paint
1 41x82 Curtain rod (from Walmart)
1 pack of (14) 1 and 1/2" black curtain rings with clips from Burlington Coat factory (as they had them half the price of anywhere else!!!)
I took the cup hooks and I spray painted them black and let them dry.
I then took my frames and laid them out on my dinning room table like I wanted them to look on my wall. I took the smallest frame and I placed my cup hooks 1/2" from the edge the frame.... I measured the distance between the two hooks - and this was my placement for all my hooks on my frames not matter what size the frame was. I center that distant and pre measured and predrilled small holes on the edge of all the frames to make screwing the cup hooks in easier! (This was the most time consuming part besides choosing my photos!!!)
Remember you have to put hooks on the top and the bottom edges of the first three rows of frames. On your bottom row you just put hooks on the top edge.
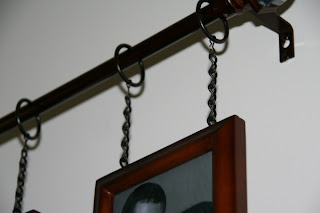
I then hung the curtain rod on the wall. I took the clips off the curtain rod rings... and placed them on the rod as well, centered then out.... then while my frames where on the table I decided how far part I wanted then and I cut the chain to fit between......
Then I hung it all up...
If you were looking at one line of frames it would go like this: the Curtain rod, then the curtain ring, chain, cup hook attached to top of frame, cup hook attached to bottom of frame, chain, repeat.....

Make sense???
Here some close ups:


If you have any questions shoot me an email!!!
Until Next Time!
Cya~
Lori


.gif)
4 comments:
Fantastic instructions. Thank you!
Have fun with your 13 inch cutter.
**U**
Nance
Love this, Love your instructions!! Thank you for sharing!!
I was looking for an awesome idea like this for all the pictures of my grandchildren. Thanks so much for your detailed instructions 👍🏾🤩
Post a Comment